My office at work used to be a one-bedroom apartment. (Yes, the place at which I work is rather unique.) Some of the apartments have been remodeled to either connect apartments into larger office areas or to at least remove the kitchen, but my kitchen remains. While the original range is defunct, I have at my disposal a refrigerator, a sink (with hot water), a microwave oven, and a countertop oven my husband picked up for me at Christmas. The company is gracious enough to allow us to use these kitchen facilities, within reason.
I figure if the smokers can go outside and spend 10 minutes or something puffing away at tobacco several times a day, I can take a few minutes to do a little baking here and there. So I have at times mixed up bread dough at home, then brought it down to my office to rise, be quickly shaped into loaves, and bake. This means my office usually smells absolutely wonderful . . . a fact which has not escaped the notice of the guys who have the office next door. (One day, after hearing them exclaim over and over about the smell in my office, I shaped cinnamon rolls at home, then brought them to my office for their final rise and baking, specifically so I could share.)
The other morning, I had wanted to make a kind of sweet roll, but as my kids had kept me busy in the morning, I found myself thumbing through my Sunset Cookbook of Breads after they had gone on the bus, looking for a quick bread, instead, sweet or not. I found one: Rieska, a barley or rye bread from northern Finland and Lapland.
I was struck by the ease with which I could transport this particular recipe to my office, so I quickly assembled the ingredients.
Ingredients:
2 cups barley flour or rye flour (I had rye.)
3/4 teaspoon salt
2 teaspoons sugar
2 teaspoons baking powder
1 cup undiluted evaporated milk or light cream
2 Tablespoons butter, melted
At home, I mixed the dry ingredients and put them in a plastic zipper storage bag for transport. I then grabbed a couple of 5-ounce evaporated milk cans and a stick of butter, put the whole thing in a plastic bag along with my cookbook, and headed down to my office.
After turning my oven on to 450 degrees Fahrenheit, checking my e-mail and doing the little things which needed to be done right away, I pulled my mixing bowl from my cupboard, grabbed a wooden spoon from the drawer where I keep all my kitchen implements, and emptied the plastic bag into the bowl.
As I do drink hot chocolate in my office, various mugs have found their way to my cupboards, so I measured two Tablespoons of butter into one of them, covered it with a paper towel, and melted the butter in the microwave. With the remaining butter stick, I buttered the baking pan I keep in my office.
I mixed one of the cans of evaporated milk in with the melted butter and poured it into the bowl, then poured about 3/5 of the other can in, as well. (I guessed. I figured if the dough was too stiff, I could always add a little more.) Mixing with a wooden spoon resulted in a reasonably smooth, but not too sticky and not too stiff dough.
I only had normal white flour in my cupboard, so after turning the dough out onto the baking pan, I floured my hands with that and started pressing it down to about 1/2 inch thick. The recipe said to make it a 14-inch circle, but this pan would not allow that, so I ended up with a rectangle, more or less.
Time to prick it all over with a fork!
Baking time is supposed to be about 10 minutes or until lightly browned, but I goofed and ended up with closer to 12 or 13 minutes. Sure smelled good!
When I pulled it out of the oven, my first thought was that it was going to be a brick. It didn't look like it had risen much, if at all, and with the whole grain flour, I wondered what the texture would be. (Of course, given that the recipe had directed me to prick the dough all over, it really is no wonder the bread didn't rise a lot. That's usually the effect desired by pricking the dough.)
I was surprised to find that while the texture was not exactly fluffy, it was soft enough, especially when spread with plenty of butter, as the recipe suggested. The hearty flavor also partnered well with the honey I coaxed out of my underused honey bear. I justified eating three pieces by the fact that it was whole grain and therefore good for me . . . (right?) . . .
It actually feels fluffier than it looks.
I will probably make this bread again sometime, as it is very fast and easy to do. This could even be made first thing in the morning, when I am getting the kids ready for the bus, to eat alongside their hot chocolate as we hold our morning scripture study.
But if not, it is a great addition to my "office cooking" list.
This year, I made Bunny Buns for the second time. Last year, my kids found the recipe in a children's magazine and pleaded so much, I finally decided to try them out, even though they took a little extra work.
The dough is actually a reasonably normal sweet roll dough with orange flavoring, found in my Sunset cookbook, as well as other sources. But this twist (pun intended) on the recipe makes it a fun Easter treat.
Ingredients:
1 package active dry yeast
1/4 cup warm water (about 110 degrees Fahrenheit)
1 cup milk, warmed not quite to boiling
1/3 cup sugar
1/2 cup shortening
1 teaspoon salt
2 eggs, beaten
1/4 cup orange juice
2 Tablespoons grated orange peel
5 1/2 cups flour, sifted
Glaze, 2 cups powdered sugar, 1/4 cup hot water, 1 teaspoon butter
I did vary a little bit from this recipe, as written. For one thing, I used 1 1/4 cup warm water and 1/3 cup of dry milk, instead of the 1/4 cup warm water and the 1 cup milk. This removes the necessity of staring at the walls while the milk mixture cools enough to add into the bowl without fear of killing the yeast. I also heated the shortening a little to make it softer and simulate the effect of putting shortening into hot milk. (It doesn't usually melt completely when you do.)
My Senior Master Kitchen Helper helped me with the oranges, grating the peel and squeezing out the juice.
Yes, that is a Mexican key lime in the background. We'd just finished a pie.
If you intend to mix this recipe by hand, refer to the link at the very top of this page, as the original recipe is written with this in mind. (You will notice it really is written for kids, as the first step directs the baker to wash their hands with soap and water . . .)
First, mix the yeast and sugar in with the warm water. Allow it to sit for at least 5 minutes to proof.
In the stand mixer bowl with a bread hook, add the salt, softened shortening, and powdered milk. Add the beaten eggs, orange juice, grated orange peel, and the yeast mixture. Gradually add the flour and mix until the dough starts to pull away from the sides. Continue mixing, adding flour a little at a time to keep the dough from sticking to the sides of the bowl, allowing it to knead for at least 5 minutes. (For more complete directions on mixing a yeast dough with a stand mixer, click here.)
When the dough is ready, drizzle a little cooking oil in the bowl and allow the mixer to twirl once to spread it around. Remove the bread hook and twirl the dough to distribute the oil more completely, then turn it upside down so the oiled side is up. Cover with paper towels and allow to rise 2 hours or until about doubled in size.
After rising . . .
On a lightly floured surface, roll the dough into a rectangle 1/2 inch thick. Cut the dough into strips about 1/2 inch wide and 14 inches long. (A pizza cutter is handy here.)
Roll the strips between your hands to make a rounded snake shape. (I confess I'm not terribly good at this part.) Cut one strip into pieces 1/2 inch long and roll those into balls. (I usually can get these from the ends and edges . . . Why cut up a perfectly good strip?)
Place one long strip on a greased cookie sheet. The recipe then says to place one end of the strip over the other to make a loop; bring the end that is underneath up and cross it over the other end. I find it simpler to understand this way:
Place the long strip on the greased cookie sheet as if it were hanging from a nail or something, with the two ends roughly even.
Then take hold of both ends and twist them twice. They will end up on their original sides.
Place a ball of dough on top of the loop, as if you are filling in the hole there.
Cover the bunnies and let them rise in a warm place for 45-60 minutes, until almost double in size. Bake at 375 degrees Fahrenheit for 12-15 minutes.
Remove the bunnies when they are lightly browned. Stir the glaze ingredients together and frost the bunnies while they are still warm.
These bunnies come out a little large, especially if your strips get out of control while rolling and increase their length. (Never happened to me . . . nope . . .) After about a dozen, I get tired of shaping them and just roll the rest of the dough into balls. This serves the dual purpose of getting me off my feet faster and making smaller rolls for people like me, who don't usually want to eat an entire bunny bun.
Regardless of the shape, they all taste delicious!
I had every intention of making soda bread the week before St. Patrick's Day, just for this blog. But, as they say, "the best-laid plans of mice and men . . ."
The night before I planned on baking, I received notification I would be required to travel for work. Not only would this mean I would be too busy to do any baking the next day, it meant I would be away for Pi Day (3/14) and St. Patrick's Day. (And I already had my corned beef in the refrigerator . . .)
Grrrrrrr.
I first made Irish Soda Bread some years ago, when I discovered exactly how delicious corned beef turned out when cooked for a long time in a crock-pot. I found a simple recipe on Allrecipes.com which I have successfully used for years. Usually, I just make it for my family, but once, I was called upon to make it for about 50 people, when my employer scheduled an employee social event around St. Patrick's Day. (The Mexican ladies working in the kitchen at the time, who are excellent cooks, felt a little uncomfortable when it came to baking this unfamiliar recipe, so I helped them out. They loved it and took home the leftovers.)
The recipe calls for buttermilk, but the standard "sour milk" substitution using milk and vinegar works so well, I don't see the need to purchase buttermilk specifically for this recipe.
From my trusty Better Homes and Gardens Cookbook . . .
For each cup of buttermilk, mix 1 Tablespoon of vinegar (or lemon juice) with enough milk to make 1 cup total. Stir it and let it sit for at least 5 minutes before using in the recipe.
Ingredients:
4 cups all-purpose flour
4 Tablespoons white sugar (This is 1/4 cup, if you want to make it easier.)
1 teaspoon baking soda
1 Tablespoon baking powder
1/2 teaspoon salt
1/2 cup margarine, softened
1 cup buttermilk or sour milk
1 egg
1/4 cup butter, melted
1/4 cup buttermilk or sour milk
Preheat the oven to 375 degrees Fahrenheit and lightly grease a large baking sheet.
In a large bowl, mix together the dry ingredients, then add the margarine. With the margarine softened, I usually just cut it in with a whisk, but rubbing it with fingers should work, as well, if you prefer that mixing method.
Stir in the 1 cup buttermilk (sour milk) and the egg. I usually use a fork to mix this mixture, just as I do for biscuits.
A note about making this in a desert: I usually need more than 1 cup of sour milk to make this work. If I use only a cup, I end up with a very, very crumbly dough which doesn't want to stick together at all. Adding about another quarter cup makes it all stick together better without becoming actually sticky.
Turn the dough out on a lightly floured surface and knead slightly. Form it into a round and place it on the greased baking sheet. I like to make mine a little flatter, rather than rounder on the top, because I like the results better.
With a sharp knife, cut an "X" into the top of the loaf.
Combine the 1/4 cup melted butter and a 1/4 cup buttermilk (sour milk); brush the loaf with this mixture.
Bake in the preheated oven for 45-50 minutes or until a toothpick inserted into the center of the loaf comes out clean. I usually brush the loaf with the butter mixture about every 15 minutes in the baking process.
And there you have it! A lovely, crusty loaf of dense bread. The outside will have a tendency to crumble off if you slice it too warm, so it's a good idea to give it some cooling time before starting to slice.
By the way, we did have our St. Patrick's Day dinner at home, just about a week late. And I did end up eating pie on Pi Day . . . taking advantage of Village Inn's "free pie on Wednesdays" special. (Luckily, the 14th was on a Wednesday!) And . . . we learned never, never to travel to Orlando on business during Spring Break . . .
Pan Dulce is a Mexican sweet bread. (In fact, "Pan Dulce" literally translates as "sweet bread".) Down here in the desert Southwest, it is very easy to find it in grocery store bakeries. The topping on the bread comes in a variety of colors, usually pink, white, yellow, or chocolate brown.
I found a few recipes for Pan Dulce on the internet, but this one from Allrecipes was the one I finally settled on making this time.
Ingredients:
For the dough:
1 cup milk
6 Tablespoons butter
1 package active dry yeast (for me, a little less than a Tablespoon--I kind of eyeballed 2/3 of it.)
1/3 cup white sugar
1 teaspoon salt
2 eggs
5 cups all-purpose flour
For the topping:
1/2 cup white sugar
2/3 cup all-purpose flour
4 Tablespoons butter, softened
2 egg yolks
The recipe said to heat the milk, then add the butter, stir until melted, and leave to cool, then dissolve the yeast into this mixture.
Ugh. It drives me crazy to wait for things to cool, so I look for workarounds.
I decided to make life more simple on myself by using powdered milk and lukewarm water, instead of milk from the refrigerator. This water could then be used to dissolve the yeast, along with the sugar. I also decided to melt the butter separately and add it to the dry ingredient mixture apart from the yeast mixture. In this way, I wouldn't have to sit there, wondering when the milk and butter mixture would actually reach the correct temperature to not kill the yeast, which has sometimes been a tricky proposition.
Yeast, sugar, and water mixture on the left, melted butter on the right.
In a stand mixer, add the salt, melted butter, and, if you are using it, powdered milk. Add a cup of the flour and mix with a bread hook. Add the eggs and mix again. Add the yeast mixture and mix again, adding more flour, until the dough pulls away from the bowl and is well-kneaded. (For a review of mixing a bread dough in a stand mixer, see here. If you want to mix it by hand, see these general directions or look at the original recipe link.)
A note here: I was counting on the flour and powdered milk to help mitigate any extra heat from the butter, which I had heated just to the point of melting. If I had added the melted butter into the mixture too hot and then added the eggs, I might have ended up with bits of cooked egg in my dough, which was not what I wanted. Be aware of this possibility when working with warm melted butter and eggs.
Cover the dough and allow it to rise in a warm place until doubled in volume, about an hour.
An hour?? Remember, this dough has not only eggs, but also butter, which means it takes a little longer to rise than a dough with no eggs or butter.
By the time my dough had finished rising, I had gone on a walk with my husband, lifted a few weights at the community weight room, gone to the local convenience store, walked home carrying jugs of milk (we counted it as part of our workout), taken a shower, and totally pampered myself with lotions, etc.
I'm not exactly sure how much time had passed, but it was closer to two hours, despite my pellet stove adding heat to my house. Good thing I had covered it with plastic wrap, then a kitchen towel, so the top of the dough didn't end up drying out.
Divide the dough into 16 pieces and roll them into balls.
With a rolling pin, flatten the rolls into oval shapes and place them on a greased baking sheet.
Time to rise again! Cover the dough and allow to rise until doubled, about 40 minutes. (This time, I covered them with wet paper towels to avoid drying out. Rising time was a little over an hour.)
While the dough is rising, it is time to make the topping. Here, the Kitchen Artiste in Training helps me separate the eggs.
Mix the sugar, flour, and softened butter in a bowl until well-blended. I mixed the sugar and flour, then added the butter cut in small pieces. Reaching deep into my memory from making Scottish scones (which I haven't posted yet), I put my fingers into the bowl and rubbed the butter into the dry ingredients until it was evenly distributed, nice and crumbly.
Beat the egg yolks with a fork to break them up, then add them to the flour mixture and mix.
This was the result. I decided to leave it plain, instead of using food coloring to make it pretty or cocoa powder to make it chocolate. (I can hear my family now . . . "What? She passed up an opportunity for chocolate?")
When the bread dough has finished rising, it is time to sprinkle on the topping. But when I got ready to sprinkle the topping on the rolls, I realized I had a problem.
How can someone sprinkle a crumbly topping on a roll with a somewhat rounded top and expect it to stay on the roll, instead of falling all around the roll?
Obviously, you can't. Even the rolls which still maintained a certain amount of flatness on the top had a tough time keeping this topping on top, and a lot was being wasted on the pan.
I had read in the comments beneath the recipe a suggestion to add a little milk and make the topping into a sort of paste, then spread it on the rolls, so I decided to try it.
It sounded simple, but it proved to be much more difficult than it sounded. How do you spread a somewhat sticky substance on a risen roll without smashing the roll? Very, very carefully . . . and it might have a difficult time coming off the spatula and sticking to the roll . . .
I topped some of the first tray of Pan Dulce with the crumbly version and some with the paste version. But after baking, I realized there was another problem relating to mixing two varieties of toppings on the same tray: the toppings don't brown at the same rate.
To be honest, I didn't like either of those results, because neither was like the topping we were used to seeing in the store. The crumbled topping tasted fine, but it didn't have the delightful texture I wanted. And the texture of the paste was not satisfactory at all. Partly because I had had to remove the tray before it had properly browned, it did not have the crunch we associate with Pan Dulce.
Back to the drawing board.
I remembered reading somewhere that another way of topping Pan Dulce is to roll the topping out with a rolling pin and lay it on the roll. I had actually tried that way with a different recipe some time earlier and had not been too pleased with the results, so I had been reluctant to do it again. But at this point, I decided it was time to cave and pull out my rolling pin. Perhaps this topping recipe would work out better than the other one had.
I took some of the crumbled topping and squished it together in my hands, then rolled it out thinly with my rolling pin.
I placed the topping on the rolls and baked them.
At last! Something which looks closer to the Pan Dulce in the store! If you want the straight lines you frequently see on bakery Pan Dulce, cut the lines into the topping after rolling it and before placing it on the rolls.
So we ended up with quite a variety of topping styles, but at least I figured out which one I like the best. Next time, I think I will divide the topping and try a little variety. Maybe I'll put cocoa in some, to make the chocolate topping. Or maybe I'll add cinnamon to some, which sounds like it would be very, very good.
When the girls tasted it, the first thing one said was, "That doesn't taste like Pan Dulce!"
"That," replied my husband, "is because you've only eaten them stale."
The ones in the store are usually very dry, while these were much softer. The topping was delightfully sweet and buttery, with enough crispness in the ones where the topping was rolled out to crack and crunch just a little. They were definitely delicious, and almost all were gone by the end of the day.
It's just as well they were, because they are definitely better the day they are made.
A little over a week ago, I had some time on my hands, so I figured I'd look up a new bread. I wanted something reasonably simple, but exotic, so I started my recipe search in Africa, then moved to Israel.
While perusing kosher recipes, I found this recipe for an overnight Yemenite bread. It isn't African, and it isn't Israeli, per se, but it seemed reasonably simple, and the idea behind it was definitely exotic!
A bread which cooks at a low temperature overnight?
I had heard of cookies which sat in a cooling oven overnight to finish, and of course, my yogurt cultures overnight in a cold oven with the light on, but a bread? Breads are supposed to be baked at high temperature, aren't they? Hasn't that been the challenge of all bakers?
This I had to see!
Unfortunately, with one thing or another, and recognizing I needed about 5 hours between first mixing and bedtime, I wasn't able to try it out until last Saturday night.
The waiting was killing me . . .
Interestingly enough, the choice to make it Saturday night was rather appropriate. Apparently this bread is made by many Jewish people on Friday evening, to be ready for their Sabbath on Saturday. In some strict households, no cooking is done on the Sabbath, in keeping with the idea that no fire should be kindled on the Sabbath. So to have a bread which is started before Sabbath starts and just cooked overnight (no fire being kindled, because it was already on), would be just the thing. We are not Jewish, and we do not have the same kind of restrictions, but by cooking it Saturday night, it was ready for our Sabbath on Sunday morning.
At last!!
Ingredients:
2 1/2 teaspoons of active dry yeast
1/3 cup lukewarm water (for the yeast)
3 Tablespoons sugar (to add while the yeast is dissolving)
3 Tablespoons honey or additional sugar (I used honey)
1 1/2 teaspoons salt
4 to 6 ounces margarine or butter (That's 8 to 12 Tablespoons of margarine or butter. I used 12 Tablespoons of butter. This will be divided.)
3/4 cup very hot water
3 cups all-purpose flour (or more, as needed)
8 eggs in their shells (optional)
The original recipe includes directions for mixing by hand, very similar to what I've written here.
I mixed the ingredients as I normally would in my stand mixer. First, dissolve the yeast in the lukewarm water with the 3 Tablespoons of sugar. In the stand mixer bowl, combine the remaining sugar, honey, salt, half the butter, and the 3/4 cup very hot water. Stir until the sugar is dissolved and the butter has mostly melted. Check the temperature to make sure it's not too hot, then add the yeast mixture. (If you are concerned it might be too hot, add the first cup of flour, mix, then add the yeast mixture.) Add the flour, cup by cup, and mix with the bread hook attachment. Add more flour as necessary to get the dough to the stage where it will start to clean up the sides of the bowl, then gently tap bits of flour to prevent the dough from sticking again while the bread hook kneads the dough for about 5 minutes.
After the dough has been kneaded, add a little oil, allow the hook to carry the dough around the bowl once or twice, then turn off the mixer. Remove the bread hook, twirl the dough around to grease the bowl with the oil, and flip the dough upside down, so the oiled side is up. Cover the bowl with a damp cloth and allow to rise for an hour or until nearly doubled in volume.
Leave the other half of the butter on the counter to soften it. You'll want it to be very soft.
Because this recipe did not include eggs, I didn't think the rising time would be terribly long. But I had forgotten that recipes with a lot of butter also take a long time to rise. It took the entire hour mentioned in the recipe, and that was with the boost of the pellet stove!
After the first rise, punch down the dough and allow it to rise again for about another hour. (Alternately, you can refrigerate it for 3 to 4 hours.) Grease the pan or dish you intend to use and preheat the oven to 225 degrees Fahrenheit. The recipe called for a 2-quart dish, about 8x8x2, which I happened to have.
Whenever a recipe tells me to roll out or shape bread dough, it has always told me to do so on a lightly floured surface. But this recipe was different. Instead of flour, this recipe calls for oiling the prep surface and rolling pin. (It was at this time I decided I'd better put on an apron. Flour on my clothes comes out easily; a drop of oil can ruin them forever.) I kept a little oil in a dish available to be able to refresh the prep surface if needed.
Shiny!
Divide the dough into 8 portions. Roll a portion into a rectangular shape. (I realize nobody would learn the proper definiton of a rectangle by this particular piece of rolled dough, but you get the idea.)
Once the dough is rolled out, spread about 2 teaspoons of butter on to the surface, then roll it like a jelly roll.
Flatten the jelly roll using the knuckles of your hand, then spread about a teaspoon of butter on top.
Roll the flattened and buttered dough into spiral, like a cinnamon roll.
Place the rolled dough, spiral side up, in your greased pan or dish. Repeat for the other seven portions of dough.
The recipe stated here, if you want to include eggs, it is time to wash the eggs and place them in the dish, but there was no indication exactly where they should be placed. I realized there was absolutely no way I could fit eggs on top of this dough and still put a lid on the dish, and there was no room to place the eggs beside the dough, so I decided to forego the eggs this time. (Subsequent research shows people do actually put the eggs on top of the dough, sort of sqeezed between the actual rolls. However, I'm not sure all people add the eggs at this point in the recipe process.)
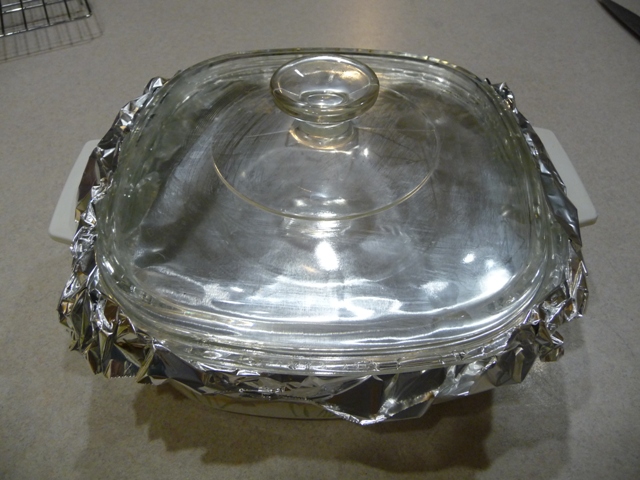
Create a false lid for the bread, using either greased paper or aluminum foil. I used parchment paper, oiled and placed on top of the bread.
Because the recipe called for a tight-fitting lid, my lid was not terribly tight-fitting, I improvised, adding a layer of aluminum foil to help seal the cracks.
And into the oven it went!
After 3 hours, with the surface of the bread a golden brown, it was time to flip it. If you have put eggs in with the bread, remove the eggs and replace them after the bread has been flipped. (I wonder if some people just put the eggs in at this stage in the game.)
When I pulled the dish out of the oven, I immediately noticed a potential problem: the bread looked as if it had been constricted in its rising by the lid of the dish. In the center, where the lid was more raised, the bread had also raised high, while on the edges, it looked a little smushed. I decided I probably should have used my deeper dish, even without cooking the eggs.
Placing one plate over the dish, I inverted the dish, allowing the bread to fall upside down on the plate. I placed another plate on top of the upside-down bread, then flipped that. so the bread was right-side-up on the new plate. Then I placed the dish upside down on the bread, and flipped the entire thing, so the bread was now upside-down in the original dish.
This presented a new problem. Because the center of the bread had risen higher than the outside, the bread was now higher overall, preventing the lid from being able to come anywhere close to the dish. Hmmmm. I decided to do what I usually did when faced with a problem of an ill-fitting lid: use aluminum foil. I pulled out a large piece of aluminum foil and proceeded to wrap the entire dish, in the fashion of a baked potato . . . Well, at least, that was my impression. I knew there was no other way I could make a "tight-fitting" lid with aluminum foil on this dish, because the dish had no rims.
Turn the oven down to 200 degrees Fahrenheit, place the pan or dish inside, and go to bed. I am not sure exactly how long this bread should really be in the oven overnight, as the recipe did not specify. Mine ended up cooking at this low temperature for about 8 hours.
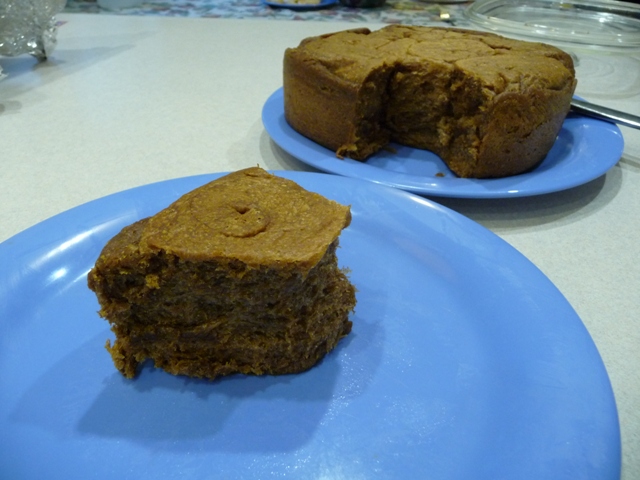
I wasn't quite prepared for what I saw when I pulled the dish out of the oven at 7:30 am.
It didn't surprise me too terribly much that it was brown on the surface. What did surprise me was the fact the brown color was carried completely throughout the bread.
What kind of a chemical reaction had taken place here?! I have no idea. Is this what happens when butter is cooked a long time? Would it have happened this way if I had used margarine? Perhaps it is because I added honey when the option was available, instead of more sugar. Perhaps there is a bit of carmelization going on. Perhaps . . . I really don't know.
The original top is on the top again!
The basic texture when the bread was torn somewhat resembled a croissant, but much more moist and less flaky. (Hardly surprising, with all that butter cooking in an enclosed space.) The flavor was also very, very buttery, as I expected.
I am not used to eating foods with such a high butter content, so it felt very rich to me--almost too rich. Then I reread the recipe and noticed the bread should be served with sugar or peppery tomato sauce. Since the bread comes from the Middle East, I figured honey might be a good alternative, as well. After some experimentation, I found that either sugar sprinkled on the bread or honey spread on the bread made all the difference. The former added a delightful touch of sweetness, while the latter lent a taste reminiscent of honey butter.
The Junior Taste Tester took a couple of bites of the bread and decided she didn't like it. The Senior Master Kitchen Helper ate some, decided she liked it, ate some more, and decided she didn't like it. The Master Kitchen Helper, who is my "foodie", was the only daughter who ended up liking it enough to eat more later on, but most of the kids decided it was just too buttery.
My husband's jaw dropped when I told him this. "Too buttery?" he exclaimed. "There is no such thing!"
He loved the bread. He loved the texture and the taste, especially with honey. In his opinion, it improved throughout the day, despite the instruction to serve the bread warm, fresh from the oven. He thought it was wonderful dipped in his Pero drink, which, he figured, would be something the Middle East people might do with their coffee.
Because of the color, I was convinced I had done something wrong, despite my husband's insistence that it was perfect, so I did some more research. None of the pictures I found showed a bread which was brown through and through, until I stumbled on this YouTube video . . . See their Kubaneh? It is brown all the way through! (They also have a few eggs.)
I will make it again, but this time, I will use a cast iron Dutch oven placed in the oven, both to allow for space to add the eggs and to more fully accomplish the goal of having a tight-fitting lid during the cooking process. It is tempting to try to reduce the butter to the lower amount suggested in the recipe, but I think my husband would not appreciate my doing that.
And who knows what will happen next time! This is, after all, an adventure.