Friday, October 28, 2011

Norwegian Cardamom Braid

My husband's name and roots are Norwegian, while my roots are mostly English and Danish (with a smattering of Scot, Irish, Polish, German . . . I'm a definite American). Not too long ago, I decided to explore our common Scandinavian cooking roots.  While I have not made or eaten lutefisk (or anything like it) and have no desire to do so, I have had a lot of fun making cookies from those countries.  It was only recently I decided to look up a bread.

This bread appears to be claimed by other Scandinavian countries, in addition to Norway.  But since I found this recipe listed under my husband's ancestral country on Allrecipes.com, I'm keeping it that way.

Cardamom Braids

2 packages active dry yeast
1/2 cup warm water (110-115 degrees F)
1 1/2 cups warm milk (110-115 degrees F)
1 1/2 cups sugar
1/2 cup butter or margarine, softened
3 eggs (2 in the dough and 1 to brush on at the end)
2 teaspoons ground cardamom
1/2 teaspoon salt
9 cups all-purpose flour
Additional sugar


A note about cardamom:  I had never used or purchased cardamom until I started making Scandinavian Christmas cookies.  Since that time, I've been amazed at the places I've found cardamom used, from Scandinavia all the way to the Near East.  How this marvelous spice escaped my notice for 41 years is a real puzzle to me . . .

I like to keep things simple, so I decided to use 2 cups warm water and enough powdered milk for 1 1/2 cups milk.  (The proportions are on the side of the container.)  I put the water in the stand mixer bowl, along with the yeast and the sugar.  In about five minutes, when the yeast has dissolved, I added the powdered milk, the softened butter, and 2 of the eggs, previously beaten.  After mixing some with the bread hook attachment, I added the cardamom and the salt, then started adding the flour.  (For more information about mixing yeast dough in a stand mixer, please see this page.)

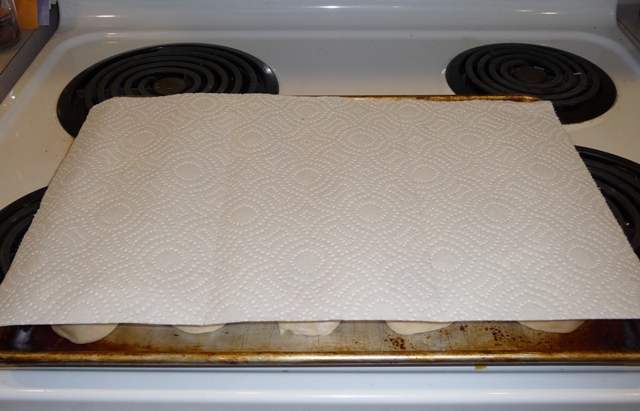
When the dough was firm enough to start cleaning the sides of the bowl, I mixed for a few minutes to activate the gluten, then poured a little oil in the bowl, allowed the mixer to move the dough around the bowl one more time, then turned off the mixer.  After removing the bread hook, I turned the dough over to coat it with oil, covered the bowl with paper towels, and placed the bowl in a warm place to rise.

The first time I made this bread, I made the mistake of starting at 8:00 at night.  I didn't think there would be a problem.  After all, when I make my "normal bread", it takes me about 2 hours, from start to finish.  What I didn't take into account is that a bread recipe this far removed from my "normal bread" recipe--more dense, with more dough by weight, etc.--is bound to take longer to rise.

As a matter of fact, it took a lot longer to rise.  By the time I finished making the bread that first time around, I was up until 2:00 am, after having desperately tried to find ways to make the dough rise more quickly (wondering if I'd killed my yeast, etc.).  So now, I make absolutely sure to find a nice, warm place for it to rise, like on top of my stove with my heated oven turned off (one of these days, I should try heating the oven just to around 90 degrees F, then turning it off and putting the dough inside) . . . Even then, it can take roughly 2 hours, just for this first rise.  So plan accordingly.


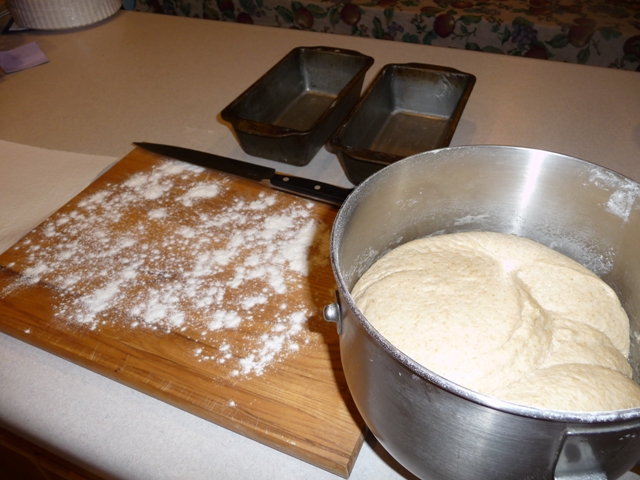
After the dough has risen to about double the original size (or until you simply can't take it any longer and are willing to just settle with whatever you get), grease a baking sheet (or two) and prepare a work surface with a little flour.  Divide the dough into four portions.  Take each portion and divide it into thirds.


Roll each third into a rope. 


Place three ropes on the greased baking sheet and braid.  (I realize my ropes and braids would win no beauty contests . . . need more practice.)

Starting the braid somewhere in the middle and working out to either end is a trick I read somewhere a long time ago.  I think it is supposed to prevent undue distortion due to the weight of the ropes, but that is only a guess.

Pinch each end to seal and tuck the ends under the loaf.  Do this with each of the dough portions. 
I can fit three loaves on one rather large baking sheet, which means I have one lonely loaf to put on a smaller baking sheet.  It also means I have to stagger the baking, so I put the lonely loaf in a slightly cooler place to allow it to rise a little more slowly, but not much.

Again . . . this dough takes forever to rise . . . so plan accordingly.  When you see about an hour later the dough is close to being risen (hooray), preheat the oven to 375 degrees Fahrenheit.
Just before baking the loaves, beat that last egg and brush it on the loaves, then sprinkle them with sugar.


Bake them for 20-25 minutes or until golden brown.


They smell heavenly!  Make sure to remove the loaves and place them on wire racks when they are finished baking.  (That way, you can get a slice sooner . . . as well as have them cool enough to put away before it gets too far past your bedtime . . . This time around, start to finish, was about 5 hours.)


This bread freezes well, if it is wrapped sufficiently.  Wrapping the loaves in a double layer of plastic wrap works if you are not planning on keeping them in the freezer long.  Or they can be wrapped in a layer of plastic wrap and placed in the bread bag you saved from the last time you had to buy a large amount of hot dog buns or something.

This is a sweet bread, good all by itself or with a little butter and maybe a little strawberry jam.  The texture is a bit denser than some breads and a little cake-like.  Don't be surprised if you notice the cardamom flavor has intensified a little bit by the next morning.  (This happens to cookies made with cardamom, too.)  The flavor is different than any bread I've eaten before, but it is strangely addicting.

My kids enjoy eating slices at breakfast or for after-school snacks.  I anticipate seeing these four loaves disappear in a little over a week, despite the fact I put two in the freezer.

Wednesday, October 26, 2011

Homemade Hummus

Nope, it's not a bread, but it goes so wonderfully with pita, I knew I had to include it.

Hummus is an absolutely delightful spread/dip, hailing from the Middle East, made primarily of garbanzo beans.  (Chickpeas.)  You can buy it in the deli section of your supermarket, but when it's so easy to make, why not do it yourself?

The one tricky ingredient to find is tahini, which is a paste made of sesame seeds.  (Think of it as sesame seed butter, sort of like peanut butter.)  I had so much trouble finding it when I first thought about making hummus that I considered getting sesame seeds and grinding them up, but it proved to be cost-prohibitive.  I finally managed to find tahini in the local co-op specializing in organic foods.  (An amusing side note . . . I once saw a lady in Wal-Mart talking emphatically on her phone, saying she just couldn't find any tahini.  I understand the frustration of searching fruitlessly for that one special ingredient . . . I waved to catch her eye and mouthed, "co-op", giving her a thumbs-up, at which point her eyes lit up, and she mouthed back, "Thank you," then told the person she was speaking to she was going to head to the co-op.)

If you don't have a local grocery store or co-op which carries tahini, never fear, the Internet is here.  It can be ordered on-line or, if you have a reasonably inexpensive source of sesame seeds, it can be made.  (I found a recipe once . . . long ago . . .)

Hummus recipes abound, but this one is the one from About.com my family and I like to make (and use in our pita). 

Ingredients needed:  Chickpeas (garbanzo beans), tahini, lemon juice, olive oil, salt, and garlic (fresh or bottled kinds both work).

1 16-oz. can of chickpeas (garbanzo beans), drained (save some of that liquid!)
1/4 cup of liquid from the can of chickpeas
3-5 Tablespoons lemon juice (We prefer 4.)
1 1/2 Tablespoons tahini
2 cloves of garlic, crushed (or equivalent, if you are using the jarred garlic . . . look on the side of the jar)
1/2 teaspoon salt
2 Tablespoons olive oil

I confess there is one more ingredient I use, but only the tiniest tap:  cayenne pepper.  Those who want their hummus more on the spicy side could add more of this.

Put all the ingredients in your kichen blender, and press ON.  Every so often, stop the blender and use a rubber spatula to scrape down the sides.  (My blender won't run if the lid is off, but I figure it's a good idea, anyway, to mention it is bad to try to scrape down the sides when the blender is running.  You would think it would be common sense, but--face it--some people have none.)  When the consistency is incorporated and smooth, take a small taste to see if you want any of the seasonings adjusted.  It should take about 3-5 minutes of blending to reach the right consistency.

Muahaha!  My blender is called a Ninja!

The flavor of hummus is good freshly-made, but I think it is even better when it has had time to sit in the refrigerator and mellow a bit.  So I try to make hummus either a day ahead of when I plan to use it or earlier the day I need it.  (About the time I make the tabouli that day, if I plan on using that.)

If you want, when you serve the hummus, you can make a small well in the center of the hummus, and add a small amount (1 or 2 Tablespoons) of olive oil in the well.

Serve it with homemade pita, or on crackers, or on other breads.  Sooooo good!

Sunday, October 23, 2011

Pita pita party!

I love pita bread.  Who wouldn't love chewy goodness you can stuff with whatever filling your heart desires?  But when I have purchased it in the store, it hasn't always lived up to expectations.

I remember being part of a group preparing a themed supper one night, and the pita delivered by our supplier was woefully lacking in pockets.  My part of the preparation was to carefully split every one of the defective pita with a knife, while trying not to split my hand in the process.  (My co-worker and I decided pita was really an acronym . . P.I.T.A. . . . Need I say more?)

But even so, I love the stuff.  So, naturally, I decided I should learn to make it.  I searched the Internet and found a delightfully simple recipe at About.com.  And--oh, boy--my family was hooked.  (That night, I tried to serve spoon tacos for dinner, which is basically taco fillings on broken tortilla chips.  I had a revolt on my hands and ended up serving taco-filled pitas.)

Since then, I've made pita several times, and we've enjoyed them with a variety of fillings.  Our standard, of course, is homemade hummus, flaked canned chicken, and salad fixings or Tabouli, but we'll also fill them with whatever we've got waiting around at the moment. (Taco meat is still a good one!)  We've also discovered the absolutely sinful delight of spreading Nutella inside a pita . . . yum . . . Bet you didn't know pita could be a dessert.

The one thing I did differently than the recipe specified was to use a baking stone instead of a preheated cookie sheet on which to bake the pita.  A baking stone maintains a more consistent heat, which I hope provides a result closer to baking in a brick oven, especially as there is a lot of opening and closing the oven in this recipe.

The ingredients are very simple:  yeast, flour, salt, sugar, and water.  (No oil, which makes it an ideal recipe for a baking stone, which can get stained when oil does touch it.  When you see mine, you'll see there has been a certain amount of staining, mostly from pizzas.)  It can be made with part whole wheat flour, as well, but this time, I just used white.


As usual when I'm making yeast breads, I mix the recipe in my stand mixer, so I alter the directions slightly.

1 package of yeast, or quick rising yeast
1 1/2 cups warm water (not too hot . . . remember, yeast likes it around 105-110 degrees Fahrenheit)
3 cups all-purpose flour
1 1/4 teaspoon salt
1 teaspoon granulated sugar

Dissolve the yeast in the 1 1/2 cups warm water in the stand mixer bowl and add the sugar.  Stir until it is dissolved and let it sit for about 5-10 minutes.  Add the salt and stir in the flour until the dough is no longer sticky and is smooth and elastic.  More thorough directions on mixing up a yeast dough in a stand mixer can be found here: Mixing a Yeast Bread In a Stand Mixer.

When the mixing process is complete, cover and allow to rise in a bowl greased with vegetable oil.  Turn the dough upside down in the bowl so there is a coating of oil on the top of the dough, to prevent it drying out as it rises.  (OK, so there is a small amount of oil in the process, but not much.)

After an hour or so of rising in a reasonably warm location, the dough will be about doubled in size, and it will be time to prepare the work surface.  In this recipe, I actually end up using both my wooden boards--one to hold the portioned dough, and one on which to roll out the pita.

Preheat your oven to 500 degrees Fahrenheit.  If you have a baking stone, position it toward the bottom of the oven.  If no baking stone is available, position the oven rack at the very bottom of the oven and place a baking sheet on it during the preheating process.

Roll the dough out in a kind of rope (mine is a very thick rope) and pinch or cut off 10-12 small pieces.  (I usually go for 12, and I cut it with a sharp knife.)  Form the pieces into balls, similar to making rolls, and place them on a floured surface.  Cover them and allow them to sit for 10 minutes.  Because there is ample opportunity for the balls to dry out in the next part of the process, I keep them covered in plastic wrap.


Roll out each ball into a 5-6-inch circle with a lightly-floured rolling pin.  The circles should be about a quarter inch thick.


Place the pita on the preheated baking stone or baking sheet.  (I can actually fit four at a time, but this go-round, I only put on three.)


Bake the pita for 4 minutes until the bread puffs up, then flip and bake for another 2 minutes.


Doesn't that look wonderful?!!

A certain amount of flour will accumulate on the baking stone, so when it starts to look too toasty, brush it gently off with a paper towel on to something else . . . another paper towel, a plate, etc.  (What matters is not to brush it into the oven . . . gets messy and starts to really smell toasty.)

Remove the pita from the oven with a turner/spatula and press lightly down on each puffed pita with that spatula.  Place in a plastic zipper bag.


I confess I blinked a lot when I first read to place the pita in a plastic bag.  But I've since found it actually works.  If the pita is left out to cool, the outside may get sort of crunchy, which makes it less pliable.  If it is placed in an open plastic bag, the heat and steam coming off the bread helps to soften it.  Keep it partly open, however, until it really is cool, or the bread will get soggy (which is what I would have expected and why all the blinking . . .)


Love those pockets!  With my family, I double the recipe every time I make it, or there won't be any left the next day.  (Especially if I have Nutella . . .)

Wednesday, October 19, 2011

Russian Yogurt Pancakes

Believe it or not, pancakes are considered a bread.  Think about what they are made of . . . flour, sugar, salt, milk, eggs, leavening, oil . . . yep, the same ingredients as many "quick breads".  To be completely honest, it would have never occurred to me pancakes would be bread until I saw the recipe in the bread section of my "Better Homes and Gardens Cookbook" . . . Yea . . . Sometimes it takes me a while to figure out the obvious.

But those are just ordinary pancakes, while today, I'm talking about Russian Yogurt Pancakes.  This is a recipe I picked up from another blog:  The Girls' Guide to Guns and Butter.  I stumbled on that blog while looking for a way to make yogurt in a crock-pot.  The link to this recipe was at the bottom of the yogurt-making page, along with other ideas for what to do with all that yogurt you just made.  (By the way, her method really does work.  I've never had a yogurt fail yet. /knock on wood)

I was a little concerned when I first read the recipe to see the amount of oil consumed in the process.  I wondered if the pancakes would be greasy or oily, and I figured the fat would be unhealthy.  (Well, unhealthy for living in the desert southwestern United States, where we do not need to consume as many calories to keep our bodies warm as the people in the cold climate of Russia.)  While it is true the pancakes ended up having a higher oil content than our usual pancake recipe, they were not any more greasy than, say, a very fresh donut.

I love this recipe not only because it helps to use up any homemade yogurt I might have which is starting to get a little more sour than I want to eat straight out, but also because the fried pancakes produced are delectable, with the crispy outside contrasting delightfully with the soft, spongy interior. I want to gobble them up as soon as they come out of the pan (but can't, because they're too hot). 


Ta Da!!  The enjoyment of the finished product!  Oh, but wait . . . I'm jumping ahead of myself.

First, you'll need yogurt, eggs, sugar, salt, baking soda (yes, you read that right), flour, and vegetable oil for frying.  Because the recipe on the Girls' Guide blog makes enough for a small army (as she points out and as I discovered to be true the first time I made it), I usually halve it, which seems to be enough for my family of seven on a regular basis.  Here is the recipe cut in half:

2 cups plain yogurt
2 eggs (Small if you have them, but if they are large, it will still work.  Alternately, you could use powdered eggs made up to the equivalent of 1.5 eggs.)
2 Tablespoons sugar
1/2 teaspoon salt
1 teaspoon baking soda (not powder)
Flour . . . I find about 2 cups to be close, but eyeball it until it makes a decent batter.  You want it to not be too pasty--still liquid-y.  (Gotta love my advanced vocabulary, hm?)

Mix all this in a bowl.  (You can have your Master Kitchen Helper do this job, if you want.)


Here is the batter all mixed.  Interestingly enough, you can see bubbles in the batter.  What that means, I do not know . . . maybe my Master Kitchen Helper mixed a bit too vigorously, or maybe something chemical is happening . . . hmmm . . . .


Heat the oil in your skillet until hot.  (If I had a cast iron one, I'd use that, but I don't, so I use what I have.)  You want it to be hot enough that if you drop the batter in it, it actually starts frying, instead of sitting in the oil, doing nothing, soaking up grease.  Normally I just use a tablespoon to drop the batter, but this time, I had a lapse of memory and used a larger spoon, although I did not drop the entire spoonful at a time.  (Just a bit larger than my usual tablespoon.)


The pancakes will get some bubbles on the top, but it isn't quite like cooking normal pancakes.  You can't wait for them to get all bubbly on the top and dry on the edges, because, well, with the oil, it isn't going to get dry on the edges.  You can, however, keep an eye on the bottom of the pancake to see the color change to tasty golden brown.  Then flip the pancakes.


A portion of the pancake will still be a bit runny when it is flipped, so do not be discouraged if some of the runny batter spreads out and doesn't end up directly beneath the flipped pancake.  (No biggie.  Still tastes good.  You can see some of mine here have spread out.)

When the second side is nicely golden, remove them from the pan and place them on a paper towel-covered plate.  Serve with your favorite topping, such as jams, a touch of syrup or, as my kids like, applesauce.  Enjoy!

Tuesday, October 18, 2011

Prickly Pear Fun!

Nope, this isn't a bread!  But my daughters and I have been dealing with prickly pears the last few weeks, so I thought I'd show you a sight seen rather frequently on my counter lately:


This is my extremely low-tech version of a prickly pear juicer.  There is more than one way to make use of a prickly pear, but as my family uses only the juice, this is the simplest way we have found.
Let's start at the beginning . . .

First, you need a nice patch of ripe prickly pears.  In some states, picking this fruit on public lands requires a permit, so be aware.  Fortunately for us, this patch is on private land.


Gather some intrepid prickly pear pickers, some tongs, and some buckets.  You really do want tongs for this.  Although the fruit, itself, does not have long spikes, it has tiny, hair-like spines which will get in your skin and hurt, if given the opportunity.  Tongs are good.  (By the way, picking prickly pears in the wind is a bad idea, too, as some of those tiny hair-like spines can loosen in the picking process and end up in your skin.  Don't ask me how I know.)

Use the tongs to gently twist the pears away from the cactus.  (The green pads, by the way, are also edible on certain varieties, but that's another story . . .)


When you've come home with your fruity loot, place them in a colander for cleaning and wash them the best you can under running water.  (Remember those tongs.)  You can use a scrubby brush to get off anything stubborn.

After rinsing off the fruit, place them in gallon-sized freezer bags and put them in the freezer.  This is to break down the cell structure of the fruit.

When the fruit has been frozen for 2-3 days or so, it is ready for juicing.  I place them in a colander (I'll be honest . . . it's a steamer piece which doesn't fit any of my pots), and place the colander over a bowl.


I then place something with weight on top of the frozen prickly pears.  In my situation, I've found the interior pot of my rice cooker, filled a little under half-way with water, fits neatly inside the colander/steamer and works very well.

Then walk away.

Yep, it's that easy.  After a few hours, the fruit will be juiced.  If you want, place it out on the counter when you go to bed and take care of it in the morning.


Here are what the prickly pears look like after the process--all nicely smushed.  (Beware of ones which stick to the bottom of your weight.)

And here is the juice . . .

 
One gallon freezer bag comfortably full of pears produces roughly three to four cups of juice.

People ask me, "What about the tiny spines?  Aren't they in your juice?"  To be honest, I've never had a problem with it.  Very rarely, I'll see one floating on the top, reasonably obvious to see on the shiny juice, so I fish it out with a spoon.  If it worries you, pass the juice through a very clean woven cloth, such as a cotton muslin.

If the juice will not be used right away, it can be frozen in quart-sized freezer bags.


Here is my stash (so far) in the freezer, with the newest bag in a glass container to prevent any potential leaking issues while the bag is freezing.  (It hasn't actually happened yet, but it pays to prevent incidents.)


"But what do you DO with all that juice?"  Good question.

We like to make pancake syrup.  I found a great recipe at Chile Chews for syrup, which is basically a jelly recipe without the pectin.  (You'll also notice she handles her prickly pear processing differently.)  Our syrup container can't handle an entire batch of this syrup, so I reduce the size accordingly:

2 cups prickly pear juice
1/3 cup lemon juice
3 1/3 cups sugar

Bring juices to a boil and boil for one minute.  Stir in the sugar.  Cook and stir until the sugar is all dissolved and the syrup is clear.

That's it!  (You can, by the way, add this syrup into a smoothie mixture . . prickly pear and banana smoothies . . . yum . . .)

As it is my husband's favorite syrup, this ends up using quite a bit of our juice store.  But because we managed to get more juice this year than we have in previous years, I'm also planning on making some into prickly pear lemonade, using one of the many recipes on-line.  It should be a lot of fun.

How does it taste?  Well . . . very fruity.

Friday, October 7, 2011

Cinnamon Roll Goodness!

Cinnamon rolls are a guilty pleasure I almost never take the time to make.  For a while, I didn't make them at all, because my recipes came out rather dry, not soft and chewy, as I prefer them.  Then I visited my sister and ate some of hers . . .

Yum!!!

She has a bread machine, which I stubbornly refuse to purchase, in which she mixes her dough, but the shaping, of course, has to be done by hand.  I figured the recipe would work just as well mixed in my Kitchenaid mixer, so I persuaded her to share it with me.

I haven't been disappointed yet.  /licks fingers

I still make them infrequently, but they have been incorporated into our family traditions.  Twice a year, when our church holds its general conference sessions in April and October, broadcast over the Internet, satellite, etc., I make them for Sunday morning breakfast.

(Ok, so I make them Saturday night, because I don't want to get up early in the morning for a yeast dough . . .)

So here is my sister's recipe:

Cinnamon Rolls

1 cup water
1 large egg
3 1/4 cups bread flour (I use all-purpose, but I can't tell you the exact quantity, because I use a mixer.)
1/4 cup sugar
1 tsp. salt
3 Tbsp. dry milk
1/4 cup butter
1 1/2 tsp. active dry yeast (My brand of yeast starts to taste really "yeasty" if I put in as much as most recipes call for, so I only used 1 tsp.  Get to know your yeast; it really makes a big difference.)

(You will need more butter, brown sugar, and cinnamon later on, so get them out, but ignore them for the time being.)

Her recipe tells me to add it to a bread machine (*ack*, *gag*) and select the dough cycle.  My method is a little different . . .

As a side note, I've got to tell you about what ended up being the best bridal shower gift ever.  Here it is:


Yes, that really is a composition notebook with contact paper on it.  Inside were a few favorite family recipes from the sweet lady who prepared this book.  Since that time, I have written or pasted myriad recipes on its pages, numbering the pages and noting in the back of the book where everything is by food category.  Here is the page with the cinnamon rolls:

Obviously, there are some favorite recipes on those pages . . .

Anyway, gather the ingredients and prepare to begin . . .


Yes, I buy store brands whenever possible.  Luckily for me, most breads I have made so far are not that picky.  The canning jar contains my yeast, which I store in the freezer.  In this way, I can be reasonably sure it is still good when I want to use it.

Success in bread recipes with yeast is all about temperature.  If the water you use is too hot, it will kill your yeast, but if the water is too cold, you will be waiting forever for your dough to rise.  (Long rising is actually used in some recipes, but not in this one.)  The water should be lukewarm, just a touch over your body temperature, roughly 110 degrees Fahrenheit.  If you take a dry finger and put it in the water, it should feel ever-so-slightly warm, but not bathwater warm.

Dissolve your yeast in the lukewarm water.  This can be done either in a cup or in the mixer, such as I did this time.


After the yeast is dissolved, start adding the other ingredients, except the flour.  If you intend to use the bread hook throughout the process, as I did, I highly suggest beating the egg before adding it.

Mix and start adding the flour.  The first cup can pretty much be added all at once.  After that . . . be a little more careful.  The dough will progress to something like this:


As more flour is added, the dough will start to make more of a ball around the hook, while still sticking to the bottom of the bowl.  At this point, keep adding flour, but only do it a little at a time--just enough to persuade the dough to stop sticking to the bottom of the bowl and clean up the sides a bit.  Finally, you will end up with something like this:


At this stage, tap flour a little at a time to keep the ball of dough from sticking while you allow the dough to knead, roughly five minutes or so.

Turn the mixer to the lowest speed, drizzle a little vegetable oil down the inside of the bowl, and allow the ball of dough to move around the bowl one or two times.  Stop the mixer, remove the bread hook from the machine, and scrape (with your fingers--it's easier that way) the dough down off the dough hook.  Twirl the ball of dough to evenly spread the oil around and turn it upside down, so the greased side of the dough is up.

Time to rise:


Cover the bowl with paper towels or a very clean dishtowel, and walk away.  Check back in about an hour, or if the room is warmer, perhaps a little sooner.  You want the dough to about double in size.


After the dough has risen, prepare your working surface by sprinkling it with flour.


Now it's time for that more butter, brown sugar, and cinnamon.  Melt the butter (I do it in the microwave) and mix 1/2 cup brown sugar with 1/2 Tbsp. cinnamon.  (You can add more cinnamon if you want it more spicy.)

Turn your dough out on the floured board and roll it in a long rectangle (about 8-9 inches by 16-18 inches).  Spread the melted butter on the dough and sprinkle on the cinnamon-brown sugar mixture.


Roll the dough from the long end.


(Obviously, I need a bigger board . . .)

Cut the rolled dough into 1 to 1 1/4 inch rolls.


Spray a large baking sheet with nonstick spray or grease it with shortening.  Place the rolls on the baking sheet, about 2 inches apart.


Cover the tray lightly with a damp towel (or paper towels) and allow the rolls to rise in a warm place about 45 minutes or until they've doubled in size.  (I rise them on the stove and turn on the oven to a low temperature, then preheat it as the rolls get closer to the end of their rising time.  Just make sure the tray is not sitting on top of the unit which vents the oven.  Bad idea.)


The rolls should be baked at 375 degrees Fahrenheit for 12-13 minutes or until very lightly browned.


Here they are!  After they have cooled, they can be iced, but I prefer to drizzle a simple glaze over them while they are still warm (but not hot).  The glaze is made with 1 cup powdered sugar, 2 Tablespoons milk, and about a half teaspoon of vanilla.  Simple--mix it up and drizzle over the rolls.


Yum, yum . . . The glaze adds just the right amount of sweetness.  Sit back and watch the rolls disappear!


The Bread My Mother Taught Me

. . . or, as my 10-yr-old calls it, "Normal bread."

My mother taught me to make bread when I was a teenager.  I hated the task, because it was required of me, but I did it, because it was expected of me.  We made four loaves at a time--as much as our large mixer could hold--and our family of eleven went through them in about two days.

Somehow, baking for your own family is more rewarding than baking because you are required to do so as a teenager.  My husband and kids turn up their noses at regular "store-bought" sliced bread and only want sandwiches when they are made with homemade bread.  (They'll tolerate store-bought specialty rolls.)  They are so spoiled . . . good thing I love 'em . . .

My Kitchenaid mixer will only hold enough dough for two loaves, so I cannot be quite as productive as my mother.  And, like most kids, I have created variations on her bread, adjusting it to my personal taste.  So I'll include both the recipe she gave me and the variation I usually make.  (Both recipes are scaled for two loaves.)

My Mother's Recipe

1/2 cup lukewarm water
1 1/2 Tablespoons yeast
2 Tablespoons sugar

2 cups water
1 Tablespoon salt
2 Tablespoons vegetable oil
Flour (About 6 cups.  If you want, you can make 2 of those cups whole wheat flour.)

My Variation

1/2 cup lukewarm water
1 Tablespoon yeast  (The yeast I use will leave a very yeast-y flavor if I add more.)
2-3 Tablespoons sugar

2 cups water or whey, if I have it after making paneer, a fresh cheese (aka queso fresco)
1 Tablespoon salt
3 Tablespoons vegetable oil
Flour (About 6 cups.  I am very variable when it comes to flour.  I've used part whole wheat, as my mother has, or I've ground spelt and used it in place of the whole wheat, or I've added a half cup milled flax seed.  I've also added oat flour ground from oat groats, but this has to be done sparingly, as there is no gluten.  I haven't yet tried making gluten-free products, so I don't have any of that gluten stuff to add in and have to depend on the gluten I get from my flours.)

The wonderful thing about this bread is, as my kids would say, it is not "rocket science".  In our family, saying a recipe is "rocket science" means there is not much margin for error or variation.  (You'd better follow it closely, or it won't turn out right.)  This bread is most definitely not "rocket science".  If you want to add powdered milk or an egg, just for giggles, or to experiment with textures, go ahead.  It will turn out just fine.  I've done it.

Here are the ingredients I gathered this time around.  The container in the front holds whey, left over from my cheese-making a few days earlier.  (Never waste whey, if you have it.  It's good for you.)  The container in the center back is whole wheat flour I ground with my Kitchenaid grain mill attachment.  I keep my yeast in a canning jar in the freezer.  (The Master Kitchen Helper in the background is not necessary, but having one makes baking more fun.)


You may wonder why the liquids have been divided in the recipe.  The half cup of lukewarm water is for dissolving the yeast and sugar.  Remember, Success in bread recipes with yeast is all about temperature.  If the water you use is too hot, it will kill your yeast, but if the water is too cold, you will be waiting forever for your dough to rise.  (Long rising is actually used in some recipes, but not in this one.)  The water should be lukewarm, just a touch over your body temperature, roughly 110 degrees Fahrenheit.  If you take a dry finger and put it in the water, it should feel ever-so-slightly warm, but not bathwater warm.

Put the yeast and sugar into the lukewarm water and stir gently, then leave it for about five minutes. 

In the mean time, go ahead and add the salt and about two cups of flour (I start with the whole wheat) to the mixer bowl.  Add the 2 cups of water (or whey, or milk) and start stirring.  (You can use a medium speed on the mixer at this point.)  Add a cup of white flour, and continue to stir.  This is about how it will look at this point:


Now is the time to add the yeast mixture to the mixer.  (And keep mixing . . .)  Continue to add flour until the dough forms a nice ball which has mostly cleaned up the sides of the mixer.


After kneading at a lower speed, add a touch of oil to the bowl, just to grease it, and stop the mixer.  Swirl the dough around in the bowl to make sure it's nicely greased, then turn the dough upside down, greased side up.  Cover and let rise until about doubled in size, about a half hour for this recipe with a decently warm kitchen.  (For a more detailed explanation of the basics of stand mixing the dough and rising, see Mixing a Yeast Bread In a Stand Mixer.)


When the dough has finished rising, prepare a work surface with a little flour and grease two loaf pans with shortening.  (My pans are 8"x4". . . . Here is everything all ready, with the risen dough.)


Because this is enough dough for two loaves, it needs to be split before it can be shaped.  A sharp knife will do the trick.  Really good bakers would use a scale to make sure the dough has been evenly split, but my method is somewhat more low-tech.  I take a ball of dough in each hand and see if they are about equal . . . (Yes, this means that frequently, I have one loaf a bit bigger than the other.  They still taste good.)  If the divided dough is uneven, just take a pinch from one and stuff it into the other one.


Many people shape loaves by flattening them, then rolling up the dough.  I've done it before, and if you want to keep it simple, go ahead.  But my usual method isn't quite as pretty.  I tend to flatten the loaves a bit with my hands (spread them out a bit--no rolling pins here) into a sort of rectangle, then take the long sides, bring them together, and pinch.  Then I move to each end, bring the sides of a single end together, and pinch.  (Same on the other end.)  It's easy to do, but difficult to describe, and even more difficult to photograph while you are doing it.  Here's what it looks like when it's done:


When I want to put it in the loaf pan, I take hold of it by the pinched-up part, turn it upside down, and put it in the pan.

Now the loaves must rise in their pans, again, about a half hour, but sometimes less.  This is a good time to preheat the oven to 400 degrees Fahrenheit, which can serve double-duty by making a warmer place for the loaves to rise.  (Caution:  do not put them where the oven can vent directly on them.  It can cause drying in spots of the dough.)  When the dough is peeking above the tops of the pans, but not enormously above the tops of the pans, the loaves are ready to be baked.


Bake the loaves at 400 degrees Fahrenheit for about 25 minutes.  Keep them in a position roughly centered in the oven while baking.  (Trust me . . . if they are too close to the top, the tops will get overly brown, while the bottoms will be too light.)


When they are done, they should be nicely browned on the top and sound somewhat hollow when tapped.  Remove them from the oven and from their pans.  They can be cooled on their sides either on a clean dishtowel, a paper towel, or a baking rack.  (If you leave them too long on their sides on a baking rack, they will have nicely indented lines.  If you do not want lines, it's probably better to cool them on a paper towel or something.)  When the loaves have cooled for a while, it is a good idea to stand them up.


You can cut it when it is still warm, but it is more difficult, and the slices will need to be thicker to avoid having them break apart.  For best results, wait until it is completely cooled to slice.  (If you can stand it with all those tempting aromas . . .)

This bread makes great sandwiches, tasty toast, or just plain good eating.  Thanks, Mom!!